Upgrading SM-8 and BM-5 firmware
The new v3 firmware for the SM-8 and BM-5 have several new
features that many users will appreciate. Among these are the ability to
do all configuration from your computer instead of the buttons on the
front panel. Another cool feature is the ability to give your antennas
names instead of the generic "Ant 1, Ant 2, etc. You may also set your
own custom frequency limits for each band. The new configuration app
also includes a firmware uploader targeting the specific product which
simplifies the firmware uploading process.
The first two thing you need to do before performing the firmware
upgrade to download the firmware file and the new configuration
application for your controller (SM-8 or BM-5). These files are
available on the Downloads page.
It is preferred you save these files to a new folder on your computer
and not to the desktop. The configuration application, like all Hamation
software, is a stand-alone app and no special installation is required.
You will also need an unbent paper clip, toothpick or short piece of
wire handy before proceeding. It must be small enough to fit in the tiny
hole on the front of the unit just to the right of the LCD display. You
will need it to start the uploading process. Behind that hole is the
pushbutton to start the firmware bootloader.Here are the steps to update
the firmware:
 Step
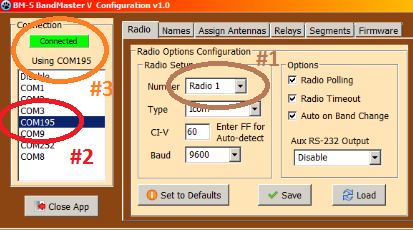
1 - The first step after the app is running is to connect a USB
cable from the unit to the computer. A new COM port will be added to the
list. If you are not sure which one, unplug the USB cable, wait a 5 to
10 seconds and plug it back in. One of the listed ports will be removed
and then added back to the list. This is the one to select. Be sure it
says "Using COM x" to verify the port has been opened. Before going any
further be sure to update
the USB Legacy Timer for this port if you have not previously done
so. This will greatly reduce the time required to update the firmware.
Be sure to click on Disable in the port list before changing the port
settings. Instructions on how to change the Legacy Timer are here.
Return here to Step 1 when finished.
Step 2 - Next you need to click on the Firmware tab to
access the firmware upload utility.
 Step
3 - Now you need to load the new firmware file. Click on the
Load button and choose the Hex file containing the new firmware. The
firmware filename should appear in the Firmware File box.
 Step
4 - Next click on the Start button.
Step 5 - Now using the paper clip (toothpick, wire, etc)
press and release the button in the tiny hole. The uploading process
will not begin. Wait for it to complete before proceeded. The uploading
will take several minutes to finish. Proceed with configuration after
the firmware has been updated.