Antenna Switch Installation
After mounting your switch on a wall, tower or in an enclosure, the first step in setting up a ShackLAN Antenna Switch is to connect it to the network. Also be sure you have connected your controller to the network. Instructions for wiring the network connector are here. After you connect the network cable to the connector block, plug it in to the control board, apply power to the controller and verify there is a green blinking LED (Outdoor version only). If not, double check your wiring and verify there is power applied to the controller. Also check to be sure you did not tighten the wire clamps onto insulation and that the wire is inserted between the clamping surfaces.


Network Address - Switches
|
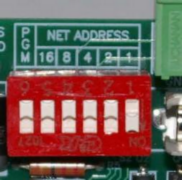
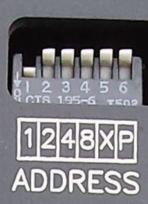
The next step is to set the address of the switch. The factory setting is switch #1. All ShackLAN switches in your system must have a different address. If you have only a single ShackLAN switch in you system you may use the factory default setting. DIP switches 1 thru 4 are weighted 1,2,4,8. The address is determined by adding the numbers for each switch in the On position. For example. if you have switches 1 and 3 on the address would be #5. Switches 5 and 6 should be in the Off position. The photo at the right shows address #1 selected. If you plan to only control the switch manually with one of our controllers there is no need to continue to the configuration process; however, if you plan to control the switch with our band decoders or the ShackLAN Control Center software you will need to complete either the Basic mode or Expanded mode configuration from our Control Center software.
|
|