
CR-5 CAT Router
Order CR-5 CAT Router - $179
| *
Radio RS-232 to USB interface * 3 additional RS-232 ports to route data to your amplifier, tuner and other accessories Forwards RTS and DTR from all ports to radio * Compatible with Kenwood, Elecraft and Yaesu FT-2000 and later radios. NOTE: Now compatible with RF-2K amplifier. Many thanks to Rein (ES6RW) and Doug (KL7DUG) for their help testing with the RF-2K. |
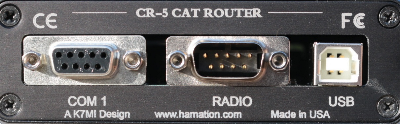  |
The Hamation CR-5 CAT Router provides the ability to connect multiple devices to a radio's RS-232 interface. The CR-5 has an internal RS-232 to USB interface to allow easy connection of the radio to your computer. There are three additional RS-232 ports that may be connected to your stations accessories such as amplifiers, SteppIR controllers, etc. Data is sent from the radio to the USB and other RS-232 ports in real time. Data from ports other than the radio port are forwarded to the radio only in complete packets to eliminate the possibility of data corruption when multiple devices simultaneously send commands to the radio. Baud rate is fully selectable. The CR-5 also routes RTS and DTR signals from all ports to the radio. DTR and RTS routing is done by hardware so there is no letency when these lines are used for CW keying and PTT. This function may be disable on a per port basis. Some radios, such as the Elecraft K3, can use these signals for PTT and CW keying. Having this function in the CR-5 eliminates the need for external interfaces and associated cabling.
Upgrading to V2 firmware
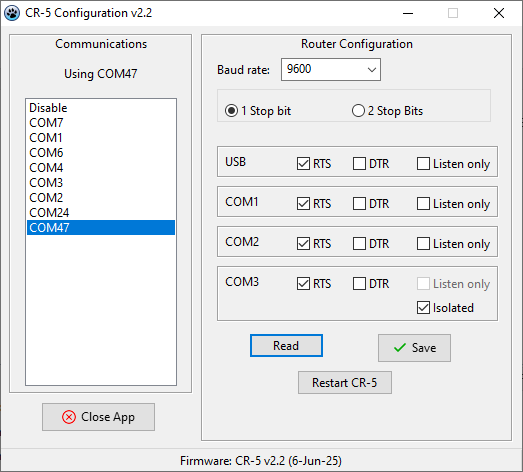
The new v2 firmware has new features to place a port in listen only mode. Ports that are placed in Listen Only mode will receive radio data but will not be able to send data to the radio. There is also a new option place COM3 in Isolated mode. This new mode will only send radio data out COM3 that was requested by the device on COM3. This is useful for devices that require full control of the radio. (A very bad idea as it prevents logging software and remote radio control from accessing the radio). The Isolated mode can help eliminate issues some devices have when receiving radio data that was not requested.
Updating the CR-5 firmware requires removing the circuit board from the case. Simply remove the four screws from the front or rear panel and slide the board out. The PROGRAM button referred to by the Uploader instructions is plainly labelled on the board. The latest firmware and configuration app are available on the Downloads page.
The RESET button does not reset any configuration data. It functions the same as powering on the unit.Installation Part 1
The first step in installing and configuring your CR-5 is to download the CR-5 Configuration Utility. The configuration software is a stand-alone application and requires no installation. DO NOT APPLY POWER YET.
Power connection
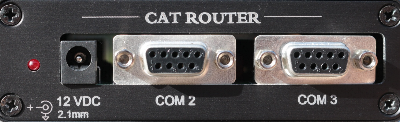
Connect a 12vdc power source to the CR-5 router power jack. A power cable is included to connect to your station power supply. The white stripped wire is positive and the solid black wire is negative (ground).
Configuration
Preparing for configuration
(v1 firmware)
The factory baud rate is set to 9600. The baud rate may be changed
using the CAT Router Configuration utility. A link to the configuration
utility is at the top of this Installation Part 1 section. Use the
following procedure to begin the configuration process:
1 - Unplug all cables from the CR-5, including power.
2 - Run the CR-5 Configuration utility.
3 - Plug the USB cable into the router.
4 - A new COM port should appear in the port list.
5 - Click on that COM port to select it.
6 - Apply power to the CR-5 and the current settings should appear.
NOTE: The CR-5 attempts to find the configuration utility only on power
up. Configuration mode cannot be entered at any other time.
(v2 firmware)
The factory baud rate is set to 9600. The baud rate may be changed using the CAT Router Configuration utility. A link to the configuration utility is at the top of this Installation Part 1 section. The v2 firmware allows configuration to be changed at any time while the CR-5 is powered on. If you are using the CR-5 with a device that requires handshaking you will need to make a small, easy modification to the circuit board. The COM connectors have two rows of pins. A row of 5 and a row of 4. Simply connect together the two center pins on the row of four. A solder bridge will suffice. This connects RTS and CTS together. Units shipped with v2 firmware will already have this modification done at the factory. If you are not comfortable making the modification yourself, we will be happy to do it for you at no charge other than return shipping. The RF-2K CAT cable must connected to COM3 and this modification is required. You may also need to enable the Isolated mode for COM3. This will prevent the amp from getting confused when receiving radio data it did not specifically request.
1 - Run the v2 configuration utility.
2 - Connect a USB cable from the CR-5 to your computer. A new COM port
will appear in the port list.
3 - Click on the new port entry. The software will attempt to find the
correct band rate for the CR-5.
4 - After you get the indication of Configuration received you are ready
to enter your desired configuration.
5 - Click on Save to write the new configuration to the CR-5.
6 - Click on Restart CR-5 to restart the CR-5 with the new settings. You
will have to click on the COM port to reconnect if you want to change or
verify any settings.
Setting the configuration options
The configuration process consists of selecting the desired baud rate from the drop down list to match the radio and choosing which ports will have the RTS and DTR signals forwarded to the radio. The RTS and DTR forwarding is set by clicking on the desired option to place a check mark in the box. Click on the Save button to write the configuration to the CR-5. The v2 firmware has options to place a port in Listen Only mode and COM3 may be placed in Isolated mode. (RF-2K amplifier). The v2 app also has a button to restart the CR-5 with the new settings.
Exit configuration mode
For v1 firmwre exit the configuration mode by closing the configuration software and then removing power from the CR-5. With the v2 firmware there is need to actually exit configuration mode as the v2 firmware allows configuration "on the fly".
Installation Part 2
You may now connect the CR-5 to your radio and other accessory equipment. Apply power after you have made all the desired connections. After a short delay the CR-5 will enter routing mode and your logging software and other accessories should be receiving radio data.