
ShackLAN Control Center
Direct Mode configuration
Setting the targets (Direct mode)
 Target
setup is deprecated in Control Center v6. It is highly reccomended you
update the firmware in your switch controller the v6 or later. This
option is only available in Direct mode and is not used in Macro mode.
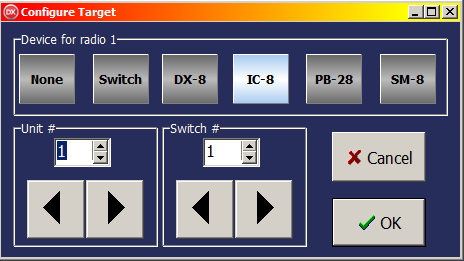
Select Switch for controllers using v6 or later firmware. A
Target is simply the ShackLAN unit that Control Center will use
for antenna selection. This step must be done correctly. For example, if
you set the target to Switch and you are using an antenna controller the
software and controller will both control the switch resulting in the
antenna selection flipping between the software selection and the
controller selection. Click on the gear icon in the main window to open
the Setup option. Now click on the Target button to open the Configure
Targets window. This window shows the current Target
configuration. Click on the button for the radio to configure the
target. Now
select your controller in Device Box. Choose Switch if not using any
controllers and want to send antenna selection commands directly to the
antenna switch. Next set the Radio/Unit #. Normally this will match the radio
number. This must be done for all radios you are using with
Control Center. Select None for
radios that are not
used. This prevents Control Center from sending commands for a radio
that is not present.
Target
setup is deprecated in Control Center v6. It is highly reccomended you
update the firmware in your switch controller the v6 or later. This
option is only available in Direct mode and is not used in Macro mode.
Select Switch for controllers using v6 or later firmware. A
Target is simply the ShackLAN unit that Control Center will use
for antenna selection. This step must be done correctly. For example, if
you set the target to Switch and you are using an antenna controller the
software and controller will both control the switch resulting in the
antenna selection flipping between the software selection and the
controller selection. Click on the gear icon in the main window to open
the Setup option. Now click on the Target button to open the Configure
Targets window. This window shows the current Target
configuration. Click on the button for the radio to configure the
target. Now
select your controller in Device Box. Choose Switch if not using any
controllers and want to send antenna selection commands directly to the
antenna switch. Next set the Radio/Unit #. Normally this will match the radio
number. This must be done for all radios you are using with
Control Center. Select None for
radios that are not
used. This prevents Control Center from sending commands for a radio
that is not present.
NOTE: If you are using an antenna controller be sure you have the latest firmware installed in it or it may not work correctly with the Control Center software.
Assign antennas (Direct mode)
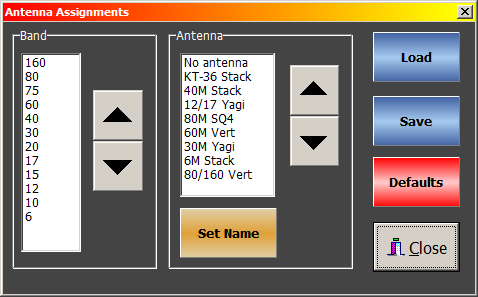 Click
on the Default Antennas button in the Setup window to access the Antenna
Assignments window. It is recommended you enter custom names for your
antennas instead of using the default names of "Antenna 1', 'Antenna 2,
etc. Not only does it show a descriptive name on the antenna selection
buttons, it also makes a bit easier to assign antennas to bands. The
easiest way to enter antenna names is to select the antenna from the
list and click on the Set Name button. Start a name with / (slash) to hide the
button for unused ports on the antenna switch. It is now time to assign
a default antenna to each band. This is the antenna that will be
automatically selected for a band when Control Center is in Auto mode.
Click
on the Default Antennas button in the Setup window to access the Antenna
Assignments window. It is recommended you enter custom names for your
antennas instead of using the default names of "Antenna 1', 'Antenna 2,
etc. Not only does it show a descriptive name on the antenna selection
buttons, it also makes a bit easier to assign antennas to bands. The
easiest way to enter antenna names is to select the antenna from the
list and click on the Set Name button. Start a name with / (slash) to hide the
button for unused ports on the antenna switch. It is now time to assign
a default antenna to each band. This is the antenna that will be
automatically selected for a band when Control Center is in Auto mode.
This is where naming your antennas comes in handy. Select a band by
clicking on it in the list or by using the Up/Down buttons. Next select
the desired antenna by clicking on it in the list or by using the
Up/Down buttons. Click Save when you are finished. You can also update
the antenna assignments in your decoders by clicking on the Set MD-12
button. This assures the decoder antenna assignments are aligned with
those in Control Center.
NOTE: When using the MD-12 with a controller (DX-8, PB28, etc) these assignments should match those in the MD-12.
Assigning controllers (Direct mode)
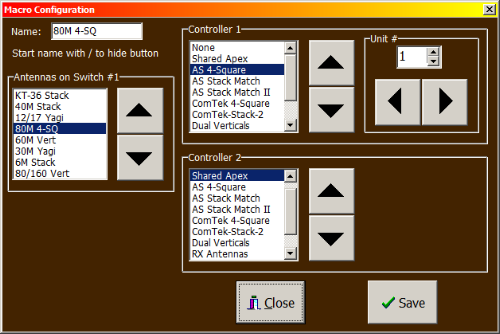 This
option is for those using Stack Match, 4-Square, Shared Apex, etc
controllers. Assigning
controllers to antennas is very simple in Direct mode. First select the
desired antenna from the list and then select the controllers from the
two controller lists. You must also set the Unit # for controllers that
have a programmable address, such as stack and 4-square controllers.
Click on Save to save your configuration. Controller 1 will appear just
to the right of the Main Antenna panel in the main screen when that
antenna is selected. Controller 2 will appear at the far right.
This
option is for those using Stack Match, 4-Square, Shared Apex, etc
controllers. Assigning
controllers to antennas is very simple in Direct mode. First select the
desired antenna from the list and then select the controllers from the
two controller lists. You must also set the Unit # for controllers that
have a programmable address, such as stack and 4-square controllers.
Click on Save to save your configuration. Controller 1 will appear just
to the right of the Main Antenna panel in the main screen when that
antenna is selected. Controller 2 will appear at the far right.
NOTE: Controller 2 is not available when operating in Dual mode.